Blog image
Blog image is a very important factor while optimizing your blog post for the search engine. It is very common that most of the time this factor is ignored or treated non-professionally.
It is important to note that there is not an absolute rule about inserting blog image in WordPress or other Content Management Systems. But when it is about an absolute search engine optimization, it become an integral part of the blog post.
Well talking further, there is no absolute rule about the placement of the blog image in the blog post. Some people use a it at the very beginning of the blog post and some use it during the blog post. Blog image is always good to insert at a place where it reflects its surrounding debate. So, it is good to know the importance of the image before inserting it in the blog post.
Acquiring a blog image legally is important, nowadays. Always avoid fringing the copyrights of the visual properties of other businesses. Well, if you are not left with a choice, you should add, Credit Image, to the destination. This will be a kind of good gesture from you.
Step 1: How to find and save the blog image from the world wide web?
If you are a newbie in blogging, you might take it as a challenge. But it is not that difficult.
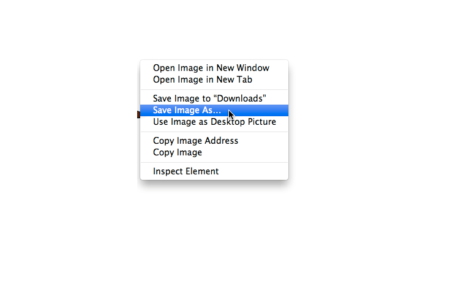
Search for the main keyword in your favourite search engine like Google, Bing, Yahoo, Ask.com, etc and then select “images” for the results. There you will be reached to the search engine results page for the images against your keyword.
The other professional approach is to go to websites where you can find free stock images. Most of the images are royalty free and you can easily find a suitable image for your blog post. Download stock images in appropriate size so that you can use it as blog images. After downloading the most appropriate image for the blog post, you can make the required tweaks in the image and then save it. If you are going to download an oversize image, it will decrease the load time of your page which may hurt the expected results and will not be considered as a search engine optimized page.
Step 2: Upload your saved image in WordPress
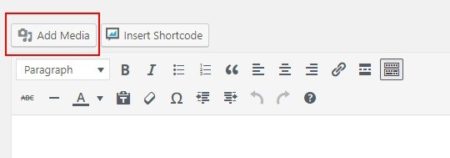
The reason for the popularity of WordPress is its simplicity. While creating a page or post in the WordPress, you can easily upload the saved image from your computer. Check the image below to see how to start the process.
Follow the steps to upload a saved image after pressing Add Media from the top of the Text Editor in WordPress. It is a better and smart way of working with WordPress, try to upload the weblog images in WordPress at once. It will save your time a lot.
Step 3: Insert the weblog image into the desired page and place
As we can see, WordPress offers a utility called Add Media. This is the place in our WordPress ‘Add Media’ section.
Select the image which you are ready to go with and move on to the next step in the section.
Step 4: Blog image attachment details
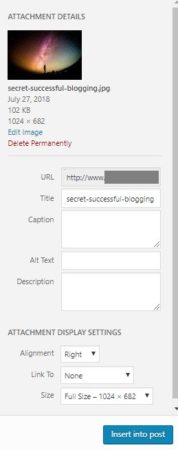
Once the blog image is selected go to the Image Title and Alt Img section to set the keyword appropriately in these sections.
Align your image to win more engagement
Aligning your blog image is important to let readers see and bookmark your post for future information. The image alignment is equally important to catch more eyeballs.
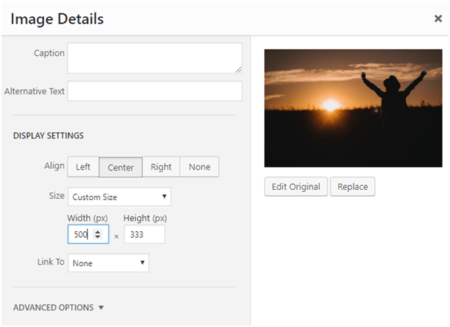
You can easily align the image from left, centre to right.
Step 5: Resize blog image as per required
Most of the time you will be able to download the image at very high resolution. It is not recommended at all to use the high-resolution image on your blog post.
It is an easy process within WordPress. Just set the desired dimension for the image(s) and move forward to the next step of setting Alt Tag for the blog image.
Step 6: Setup Image Alt Tag for blog image in WordPress
It is important to setup image Alt Tag for the blog image to make it visible in image search. This is a very common mistake while optimizing a blog post. It hardly takes a few seconds but ignored or forgotten. To setup image Alt tag for your image, you need to edit blog image by right click after selecting the image.
Step 7: how to edit the image in WordPress?
Most of the time, we use tools like MS Paint, Photoshop, Gimp or Paint.NET to edit the image. The best and smart practice is to edit the blog image before uploading it to WordPress.
If the image has been uploaded to the content management systems of WordPress, it can be edited for the following;
- Crop
- Rotate
- Image
- Scale
- Align
The smart thing that you can find in WordPress image editor, you can restore the original image at any time to prevent any damages to the original file.
Stage 8: how to add the link to your weblog image?
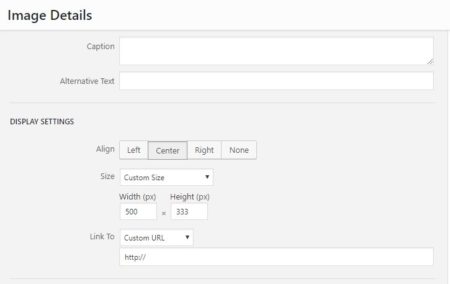
It is very important to add the link to your blog image to send traffic to some destination. This option is mostly required during the Affiliate Marketing.
To add the link to your image, start editing it and then add the required link to the destination page. Before adding the link to your image, make sure that the link is working properly.
Stage 9: how to keep blog image file size low?
It is very important to keep your blog image file size as low as possible. Every extra bit will add extra time in page load. The maximum page load time that allows the search engine like Google is between 2 to 4 sec. The major role of increasing page load time is of images along with Java Scripts.
- Always use.JPEG file formats for the blog images
- Resize blog images before uploading to WordPress.
- If blog images have already been uploaded and ready to use, SMUSH, the free plugin for WordPress can help you reduce the file size at maximum.
Stage 10: how to set blog image for Retina Screens?
Retina display is used by the Apple products which have higher pixel-per-inch than regular screens.
If an image is with dimensions of 500 x 250 (125,000 pixels) needs to be 1000 x 500 (500,000 pixels) to display in Apple devices. The share of Apple devices in marketer is more than 50% on the Globe.
To overcome this challenge, the WP Retina 2x plugin can solve the problem for you to handle blog images to display properly on the Apple devices, Retina Screens.
Hope you would have enjoyed going through each stage of inserting and editing blog image in WordPress. How have you been doing the task before? We love to learn from our readers too, do share your thoughts to add productivity.




10 Best Free Email Service Providers for 2024
Hugo BOSS cologne affiliate programs: A great side hustle job